前言
学习NestJS,主要看了
学完这篇 Nest.js 实战,还没入门的来锤我!(长文预警) - 掘金 (juejin.cn),也是跟着整时做一个笔记,大佬讲已经很清晰了,不出意外真入门了,然后试着写了登录注册的接口,成功的那一刻还是挺开心的!!!
安装
我是按照官网的Nest CLI创建的项目,也是官网推荐初学者使用的方式:
若要使用 Nest CLI 构建项目,请运行以下命令。这将创建一个新的项目目录,并使用核心的 Nest 文件和支撑模块填充该目录,从而为项目创建一个传统的基本结构。
1
2
| $ npm i -g @nestjs/cli
$ nest new project-name
|
运行完命令后:
这里简单说明一下这些核心文件:
1
2
3
4
5
6
7
8
9
10
11
12
13
14
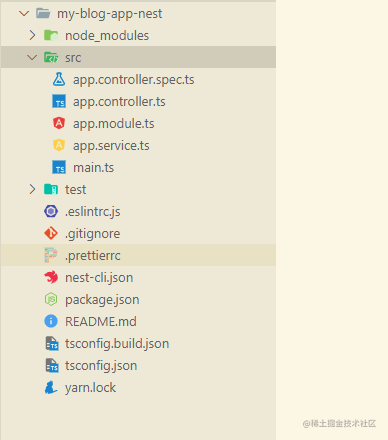
| src
├── app.controller.spec.ts
├── app.controller.ts
├── app.module.ts
├── app.service.ts
├── main.ts
| ------------------------ | ------------------------------------------------- |
| `app.controller.ts` | 单个路由的基本控制器(Controller) |
| `app.controller.spec.ts` | 针对控制器的单元测试 |
| `app.module.ts` | 应用程序的根模块(Module) |
| `app.service.ts` | 具有单一方法的基本服务(Service) |
| `main.ts` | 应用程序的入口文件,它使用核心函数 `NestFactory` 来创建 Nest 应用程序的实例。 |
|
具体可以去看这位大佬写的文章,非常好!我后面也是跟着这篇文章学习的
怎么连接数据库,接口规范统一,swagger等我都是按下面链接的大佬的文章学习的,然后也算是入了门,才开始试试登录注册的。
学完这篇 Nest.js 实战,还没入门的来锤我!(长文预警) - 掘金 (juejin.cn)
登录注册
全局路由前缀
上面链接的大佬有提过,在main.ts
1
2
3
4
5
6
| async function bootstrap() {
const app = await NestFactory.create(AppModule);
app.setGlobalPrefix('api');
await app.listen(8080);
}
bootstrap();
|
此时之前的路由,都要变更为:http://localhost/api/xxxx
创建 USER 模块
1
2
3
| nest g mo modules/user
nest g co modules/user
nest g s modules/user
|
注意创建顺序: 先创建Module, 再创建Controller和Service, 这样创建出来的文件在Module中自动注册,反之,后创建Module, Controller和Service,会被注册到外层的app.module.ts

user表实体
新建 user.entity.ts 实体,到时候可以通过TypeORM将实体映射到数据库表
1
2
3
4
5
6
7
8
9
10
11
12
13
14
15
16
17
18
19
20
21
22
23
24
25
26
27
28
29
30
31
32
33
34
35
36
37
38
39
|
import { Column, Entity, PrimaryGeneratedColumn } from 'typeorm';
import { Exclude } from 'class-transformer';
@Entity('User')
export class UserEntity {
@PrimaryGeneratedColumn()
id: number;
@Column({default:''})
nickname: string;
@Column({default:'https://i.postimg.cc/wjcFjQMD/b.png'})
avatar: string;
@Column('text')
mobile: string;
@Column({ type: 'timestamp', default: () => 'CURRENT_TIMESTAMP' })
create_time: Date;
@Column({ type: 'timestamp', default: () => 'CURRENT_TIMESTAMP' })
update_time: Date;
@Column('text', { select: false })
password: string;
@Column('text', { select: false })
salt: string;
}
|
user.dto
Nest.js自带了三个开箱即用的管道:ValidationPipe、ParseIntPipe和ParseUUIDPipe, 其中ValidationPipe 配合class-validator就可以完美的实现我们想要的效果(对参数类型进行验证,验证失败抛出异常)。
新建user.dto.ts用于校验,完善错误提示信息
1
2
3
4
5
6
7
8
9
10
11
12
13
14
15
16
17
18
19
20
21
22
23
24
25
26
27
| import { ApiProperty } from '@nestjs/swagger';
import { IsNotEmpty } from 'class-validator';
export class RegisterDTO {
@ApiProperty({ description: '昵称' })
readonly nickname: string;
@ApiProperty({ description: '头像' })
readonly avatar: string;
@ApiProperty({ description: '手机号' })
readonly mobile: string;
@IsNotEmpty({ message: '密码没填' })
@ApiProperty({ description: '密码' })
readonly password: string;
}
export class LoginInfoDTO {
@IsNotEmpty({ message: '手机号没填' })
@ApiProperty({ description: '手机号' })
readonly mobile: string;
@IsNotEmpty({ message: '密码没填' })
@ApiProperty({ description: '密码' })
readonly password: string;
}
|
user控制层
在user.controller.ts 控制层定义接口
1
2
3
4
5
6
7
8
9
10
11
12
13
14
15
16
17
18
19
20
21
22
23
24
| import { Body, Controller, Post } from '@nestjs/common';
import { ApiOperation } from '@nestjs/swagger';
import { UserService } from './user.service';
@Controller('user')
export class UserController {
constructor(private readonly userService:UserService) {
}
@ApiOperation({ summary: '注册用户' })
@Post('register')
async register(@Body() createUser:any) {
return await this.userService.register(createUser);
}
@ApiOperation({ summary: '登录' })
@Post('login')
async login(@Body() loginInfo:any) {
return await this.userService.login(loginInfo);
}
}
|
user业务层
在user.service.ts写登录注册相关的业务逻辑
1
2
3
4
5
6
7
8
9
10
11
12
13
14
15
16
17
18
19
20
21
22
23
24
25
26
27
28
29
30
31
32
33
34
35
36
37
38
39
40
41
42
43
44
45
46
47
48
49
50
51
52
53
54
55
56
57
58
59
60
61
62
63
64
65
66
67
68
69
70
71
72
73
74
75
76
77
78
79
80
81
82
83
84
85
86
87
| import { BadRequestException, HttpException, Injectable } from '@nestjs/common';
import { InjectRepository } from '@nestjs/typeorm';
import { Repository } from 'typeorm';
import { encryptPassword, makeSalt } from 'utils/cryptogram';
import { RegisterDTO , LoginInfoDTO} from './user.dto';
import { UserEntity} from './user.entity'
import { JwtService } from '@nestjs/jwt';
@Injectable()
export class UserService {
constructor(
@InjectRepository(UserEntity)
private readonly userRepository: Repository<UserEntity>,
private readonly jwtService: JwtService
) {}
async register(createUser:RegisterDTO):Promise<any>{
const {mobile,password} = createUser;
if (!mobile) {
throw new HttpException('入参缺少mobile', 401);
}
const existUser = await this.userRepository.findOne({where: {mobile}});
if (existUser) {
throw new HttpException('该用户已注册', 401);
}
const newUser = await this.userRepository.create(createUser)
const salt = makeSalt();
const hashPassword = encryptPassword(password, salt);
newUser.password = hashPassword
newUser.salt = salt
return await this.userRepository.save(newUser);
}
async checkLoginForm(loginInfo:LoginInfoDTO):Promise<any> {
const {mobile,password} = loginInfo;
const user = await this.userRepository
.createQueryBuilder('user')
.addSelect('user.salt')
.addSelect('user.password')
.where('user.mobile = :mobile', { mobile })
.getOne()
if (!user) {
throw new BadRequestException('用户名不正确!');
}
const currentHashPassword = encryptPassword(password, user.salt)
if (currentHashPassword !== user.password) {
throw new BadRequestException('密码错误')
}
return user
}
async certificate(user:UserEntity){
const payload = {
id: user.id,
mobile: user.mobile,
};
const token = this.jwtService.sign(payload);
return token
}
async login(loginInfo:LoginInfoDTO):Promise<any> {
const user = await this.checkLoginForm(loginInfo)
const token = await this.certificate(user)
return {
token
}
}
}
|
其中需要注意jwt和user.entity的实体需要在user.module.ts中引入,然后把user.module暴露出去给app.module暴露出去给app导入,这样就建立了模块之间的关系,毕竟主模块是app.moudle
1
2
3
4
5
6
7
8
9
10
11
12
13
14
15
16
17
18
19
20
21
| import { Module } from '@nestjs/common';
import { UserController } from './user.controller';
import { UserService } from './user.service';
import { TypeOrmModule } from '@nestjs/typeorm';
import { UserEntity } from './user.entity';
import { JwtModule } from '@nestjs/jwt';
@Module({
imports: [
TypeOrmModule.forFeature([UserEntity]),
JwtModule.register({
secret: 'dasdjanksjdasd',
signOptions: { expiresIn: '8h' },
}),
],
controllers: [UserController],
providers: [UserService],
})
export class UserModule {}
|
成果
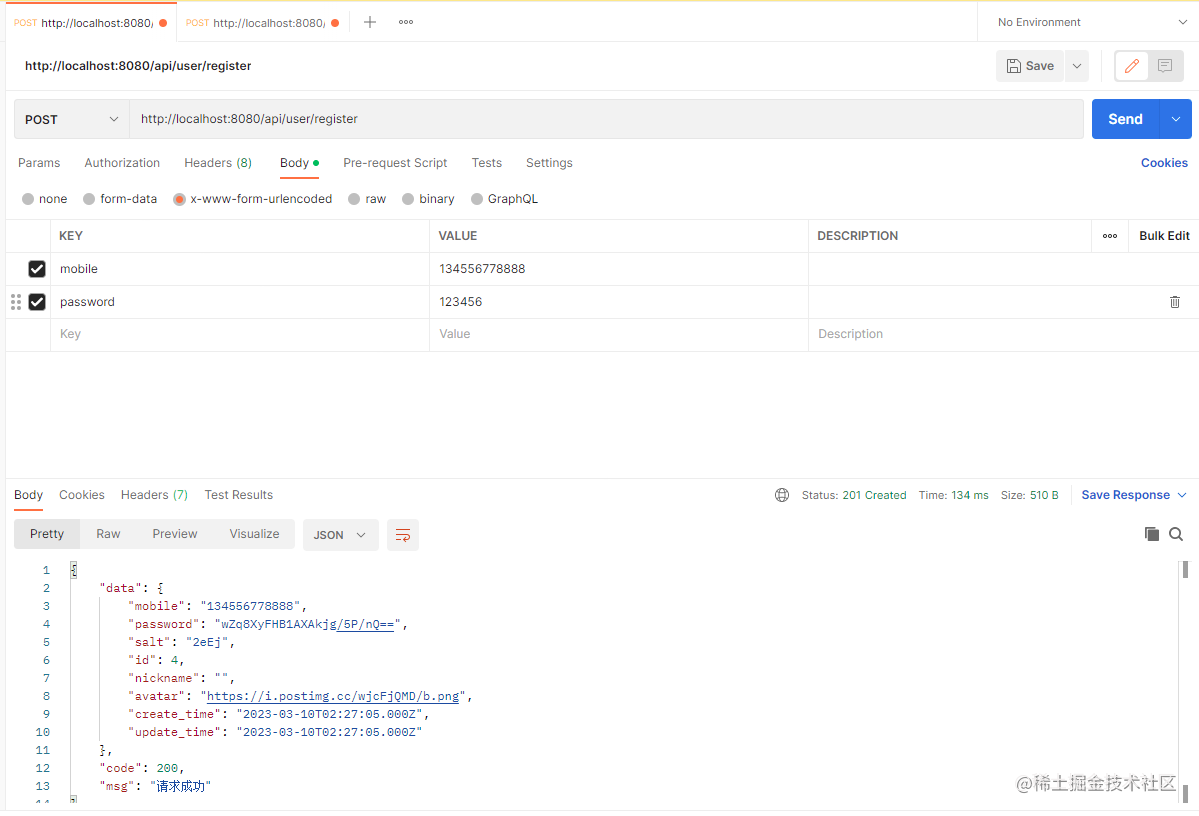
注册成功
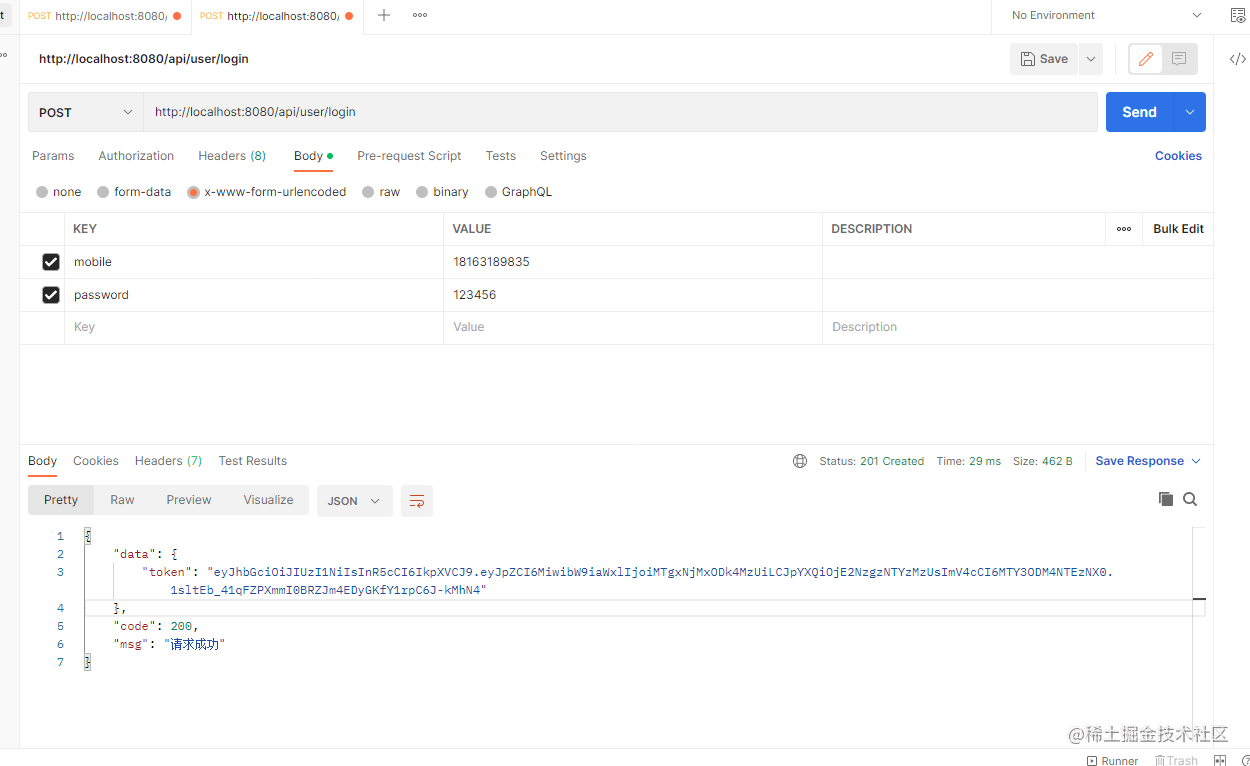
登录成功,返回token